Some of the links shared in this post are affiliate links. If you click on the link and make a purchase, we will receive an affiliate commission at no additional cost to you.
The paperless office is becoming increasingly popular, and software solutions such as Paperless-ngx help to make the management of digital documents efficient and clear. In this guide, I will show you how to install and configure Paperless-ngx as an LXC container on Proxmox. This allows you to manage, search and archive your documents centrally without having to rely on a dedicated server or virtual machine.
What is Paperless-ngx?
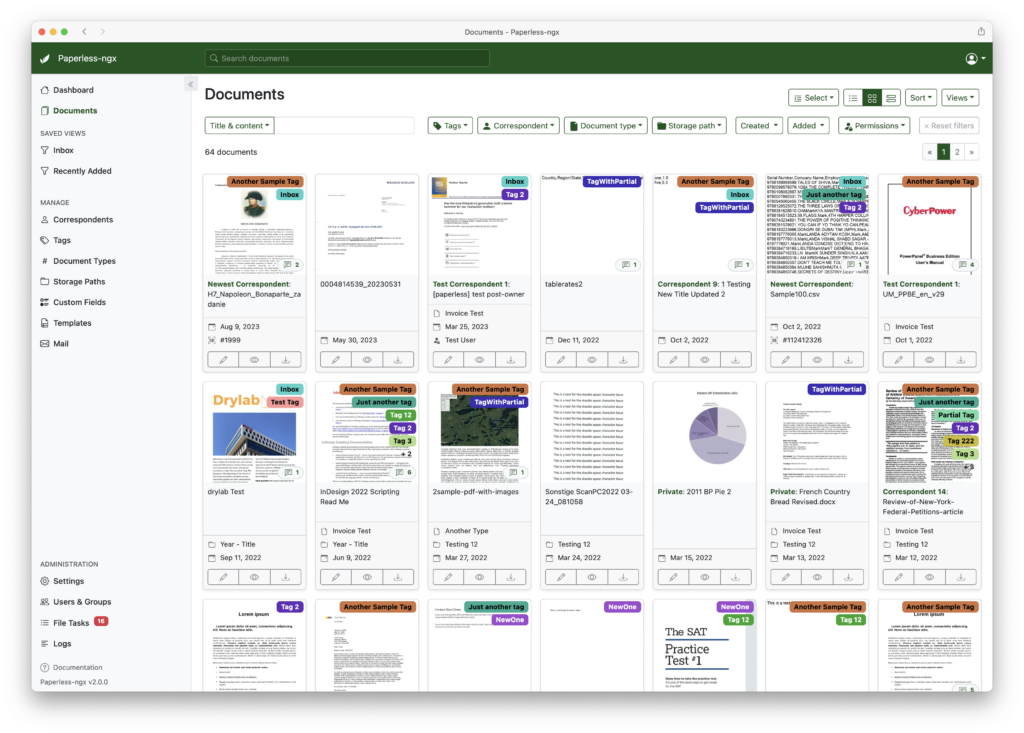
Paperless-ngx is an open source application designed to digitize and organize paperwork. It allows documents to be uploaded, managed and searched, offering features such as text recognition (OCR), tagging, automatic classification and much more. Compared to its predecessor Paperless, Paperless-ngx offers a modernized interface, improved performance and additional features for even more efficient document management.

Advantages of installing as an LXC container on Proxmox
- Resource-saving: LXC containers are lighter than full virtual machines as they share the kernel of the host system.
- Simple administration: Proxmox offers a clear web interface for creating, managing and securing LXC containers.
- Good performance: Due to the lower overhead, applications often run faster and more efficiently in LXC containers.
Disadvantages of installing as an LXC container on Proxmox
- For non-privileged containers, no CIFS / NFS shares can be mounted in the LXC container.
- Privileged users are a significant security risk for the entire host
- Limited isolation: LXC containers share the kernel with the host system, resulting in less isolation compared to full virtual machines. A security problem in the container could potentially affect the host system.
Prerequisites
Before you install Paperless-ngx as an LXC container on Proxmox, make sure that the following requirements are met:
- A running Proxmox VE server (Virtual Environment) with access to the web interface or via SSH.
- Network access from the Proxmox server to the Internet to download the required packages.
- Basic knowledge of Linux and how to use the Proxmox web interface.
Step 1: Create LXC container for Paperless-ngx
To install Paperless-ngx as an LXC container, you can use an automation script that simplifies the installation process.
- Open the Proxmox web interface: Log in to your Proxmox web interface by entering the IP address or hostname of your Proxmox server in a web browser.
- Open the shell: Go to the Proxmox interface and open the shell by clicking on “Node” > “Your server name” > “Shell” or connect to your Proxmox server via SSH.
- Run script: Run the following command to launch the Paperless-ngx LXC install script from tteck.github.io:
bash -c "$(wget -qLO - https://github.com/tteck/Proxmox/raw/main/ct/paperless-ngx.sh)"4. follow the script instructions: The script automatically creates an LXC container and installs all required packages. You will be prompted to enter some parameters such as container ID, hostname and size of the root file system. Follow the instructions on the screen to complete the installation.
5. access Paperless-ngx: Paperless-ngx should now be running in the container. You can access the Paperless-ngx web interface by entering the IP address of the container followed by port 8000 in your web browser, e.g. http://192.168.1.100:8000.
Step 3: Basic configuration of Paperless-ngx
- Create an administrator account: You will be asked to create an administrator account the first time you start. Enter your desired user name and a secure password.
- Upload and organize documents: Use the Paperless-ngx interface to upload, tag and organize documents. The application offers powerful search functions based on the integrated OCR (Optical Character Recognition).
- Set up automatic classification: Set up rules for the automatic classification of documents to automatically recognize certain document types and sort them into folders.
Step 4: Backups and maintenance
- Regular backups: Create regular snapshots of the LXC container in Proxmox to return to a previous state if necessary. Go to “Datacenter” > “Your container” > “Backup” to configure snapshots.
- Perform updates for Paperless-ngx: Update Paperless-ngx regularly to benefit from the latest security updates and features. This can be done via the command line in the container:
updateInstalling Paperless-ngx as an LXC container on Proxmox is a great way to run a lightweight but powerful document management solution. Using the automation script from tteck.github.io, the process can be greatly simplified so you can get Paperless-ngx up and running quickly and easily. This allows you to organize your documents centrally and store them securely without having to resort to a resource-intensive virtual machine.
With these instructions, you will be able to set up and optimize your paperless office quickly and easily with Paperless-ngx on Proxmox.


