Some of the links shared in this post are affiliate links. If you click on the link and make a purchase, we will receive an affiliate commission at no additional cost to you.
Home Assistant is a powerful home automation platform that controls many aspects of the smart home. Regular backups are crucial to protect your configuration, automations and integrations from data loss. This article introduces various backup options for Home Assistant, including the use of network-attached storage (NAS), the Google Drive backup plugin and virtual machine (VM) backup when Home Assistant is virtualized as a VM.
Why are backups important?
Backups not only save your Home Assistant configurations, but also important data such as automations, add-ons, user interface settings and the history of the devices. With regular backups, you can easily restore your smart home in the event of data loss or a system error without having to set everything up from scratch.
1. use network storage (NAS) for backups
Integrating a network-attached storage (NAS) is an easy way to perform regular backups of Home Assistant. The advantage of a NAS is that it provides central storage space in your home network that you can access from multiple devices.
Advantages:
- Central storage space: NAS solutions such as Synology or QNAP make it possible to store backups in a central location.
- Automated backups: Home Assistant can be configured so that backups are regularly transferred to the NAS.
- Redundancy: Many NAS systems offer RAID configurations that provide additional data security through redundancy.
Setting up network storage for Home Assistant backups:
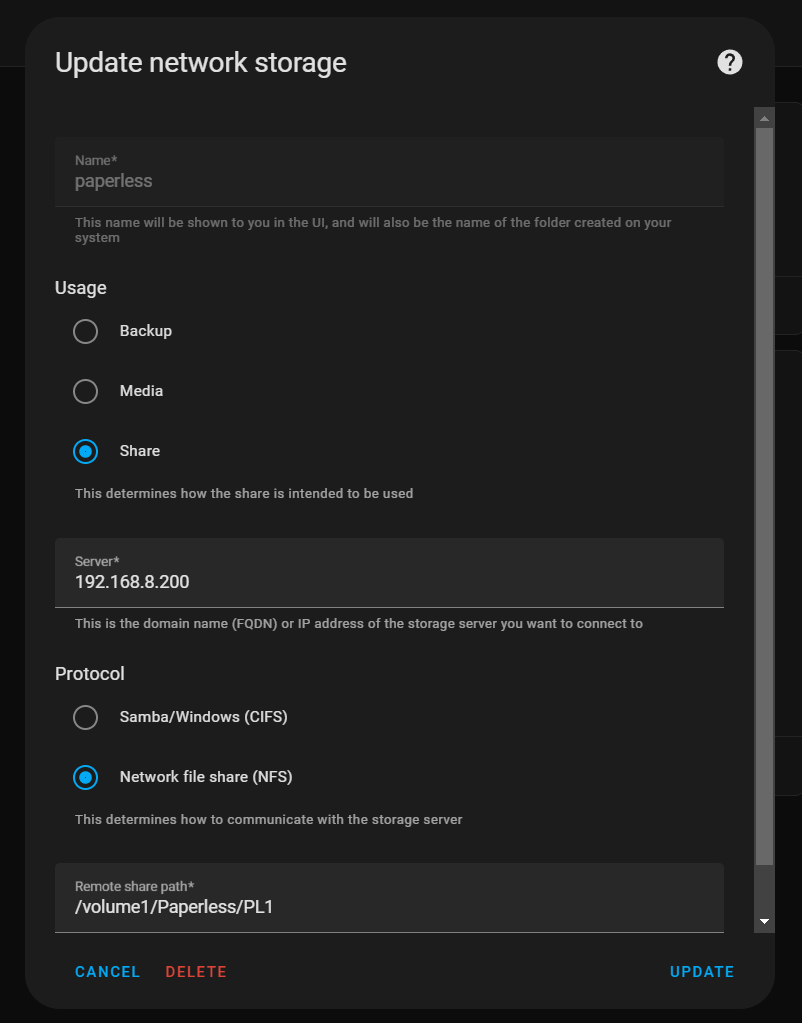
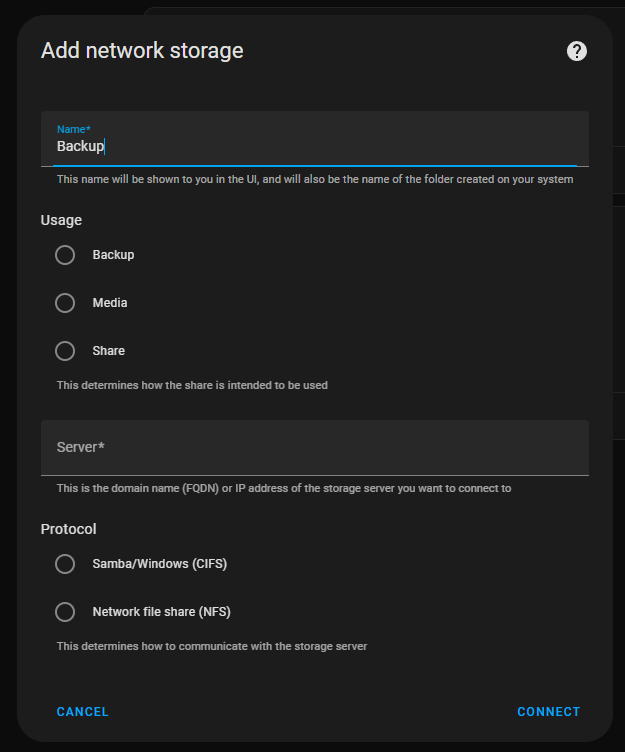
To be able to save our Home Assistant backups on our NAS, we must first mount the corresponding directory in our Home Assistant.
Home Assistant NFS / CIFS Share Mount
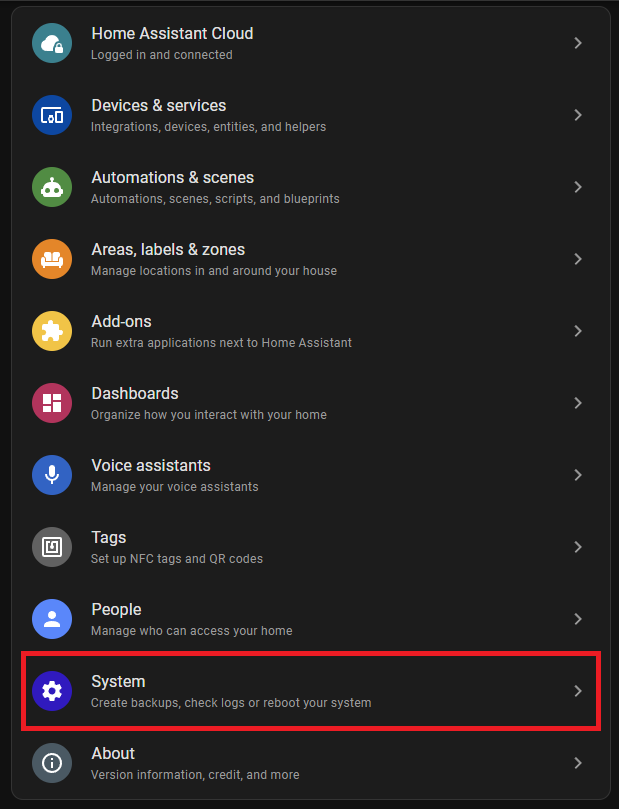
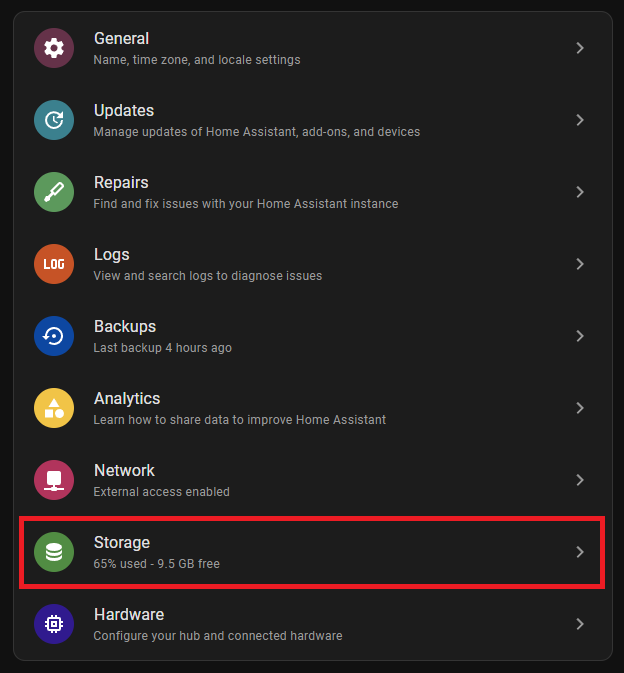
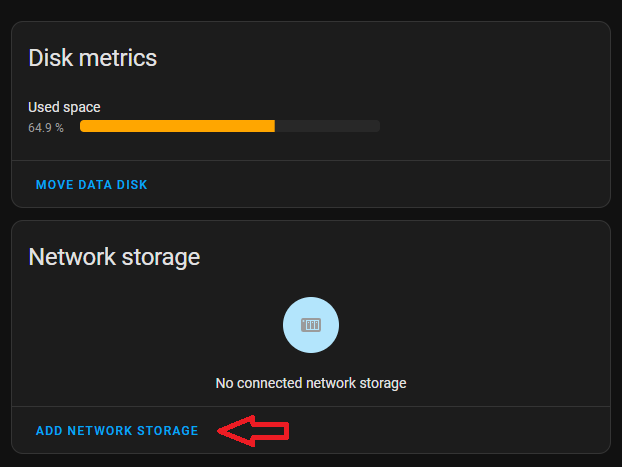
This can be done under “Settings”- > “System” -> “Storage” -> “Add Network Storage”
Set up automatic backup
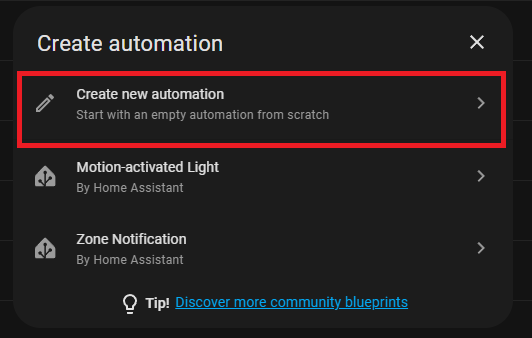
To have the backup created automatically, we create an automation. Under “Settings” on “Automations & Scenes”
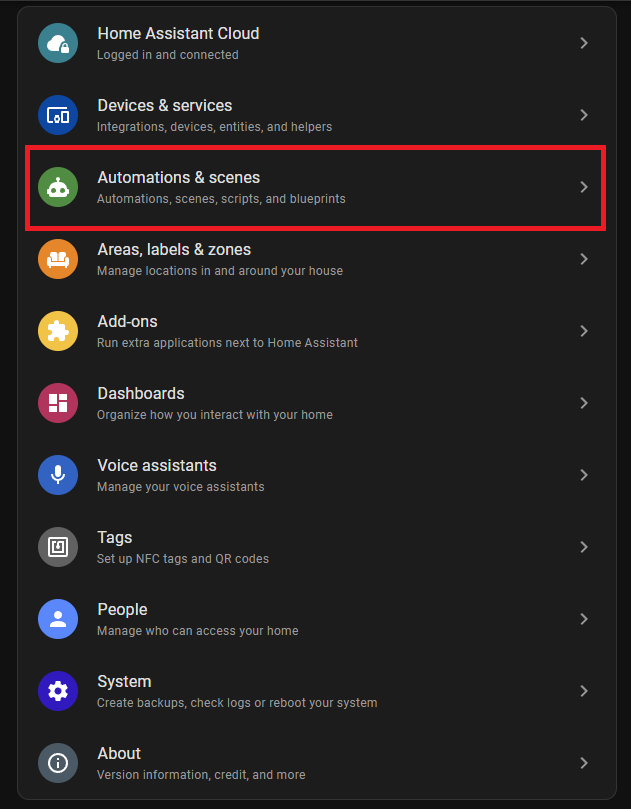
Click on the “Create Automation” button at the bottom right. Then click on “Create new automation” in the popup.
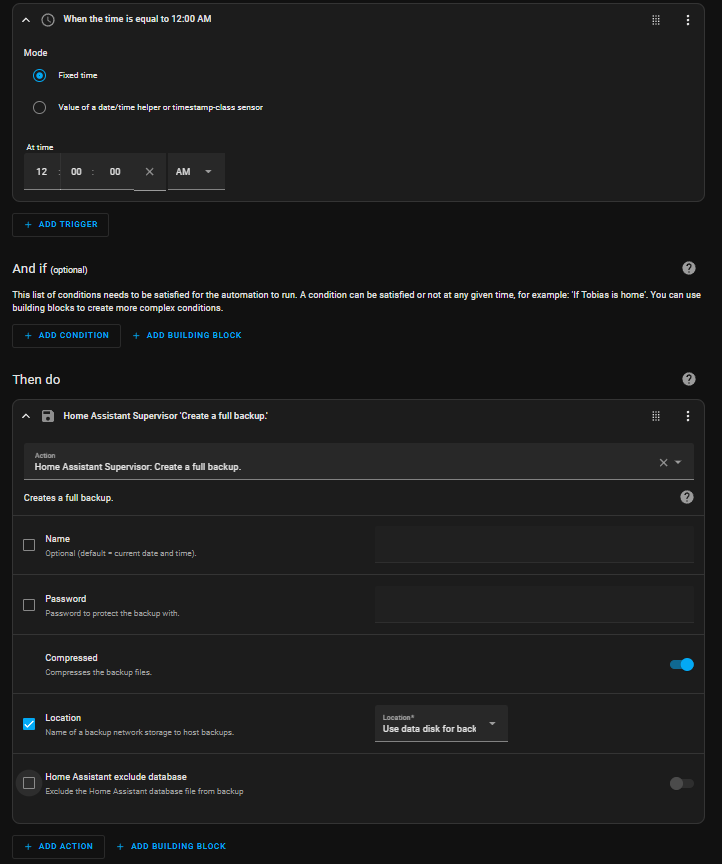
There we select “Time” or “Time” as the trigger and set our desired time. It is best to do this at a time when Home Assistant is less busy, i.e. at night. Under “Then do”, we select “Home Assistant Supervisor ‘Create a full backup'”. By clicking on Save, the automation is active and backups are created automatically. Of course, the backup location must be placed on the NAS mount that has just been created.
2. google drive backup plugin
A very popular method for Home Assistant backups is the Google Drive Backup plugin. This add-on automatically synchronizes your Home Assistant backups with your Google Drive account. It offers a simple and reliable solution for backing up your data off-site.
Advantages:
- Cloud storage: Your backups are stored securely in the cloud, independent of your local network.
- Automatic synchronization: The plugin regularly creates backups and automatically uploads them to your Google Drive account.
- Version management: You can set how many backups are stored locally and in the cloud to make efficient use of storage space.
Setting up the Google Drive backup plugin
To install the Home assistant Google Drive Backup plugin, we need to add the corresponding repository to our add-on store. To do this, we click on the three dots at the top of the add-on store and select “Repositories”

In the following dialog we have to add this URL:
https://github.com/sabeechen/hassio-google-drive-backup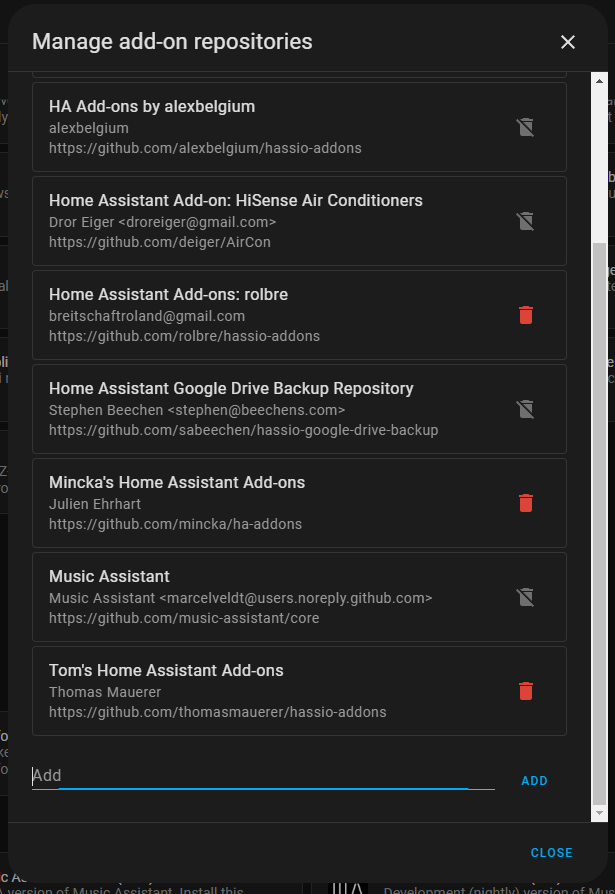
The URL must be entered in the “Add” field below and confirmed by clicking on “Add”. The repository has then been successfully added and we can find the Google Drive Backup plugin in the Home Assistant Add-on Store.
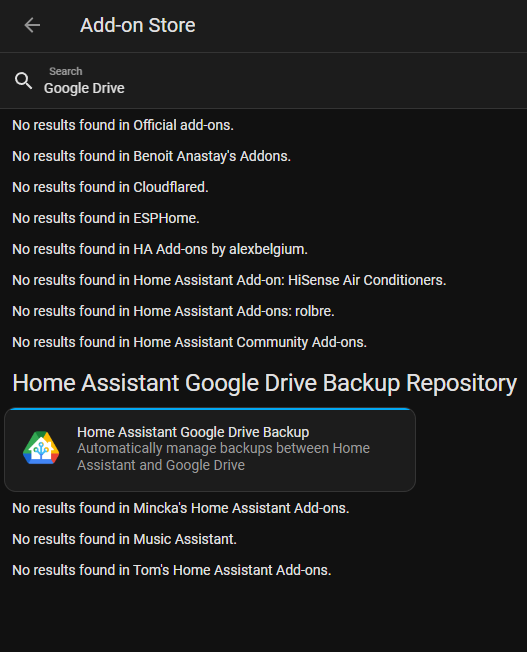
To install the add-on, simply click on the search result and select “Install Add-on”. Once the add-on has been installed and started, you will see the following overview:
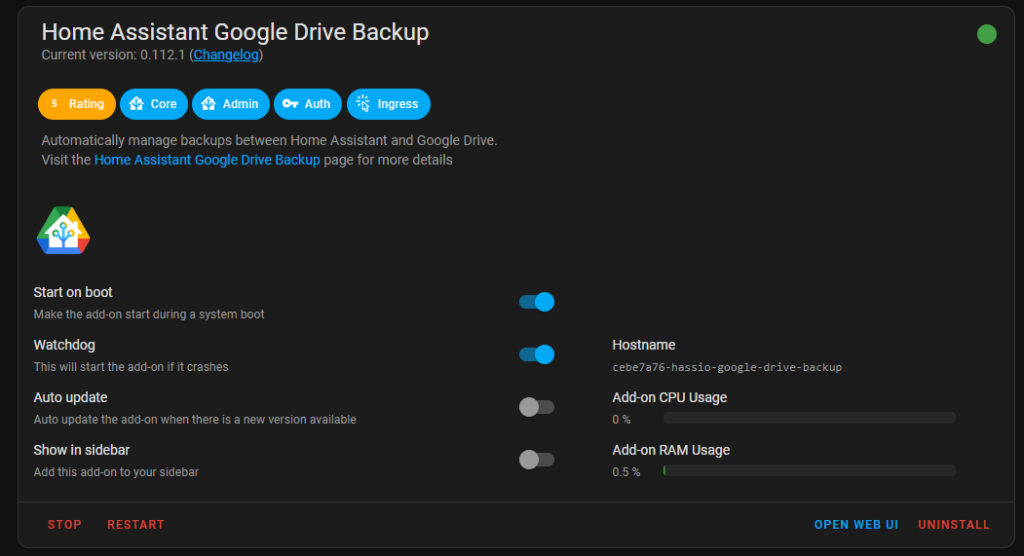
There we click on “Open Web UI” and have to authenticate ourselves with our Google account. In the add-on settings, we can adjust how many backups should be saved:
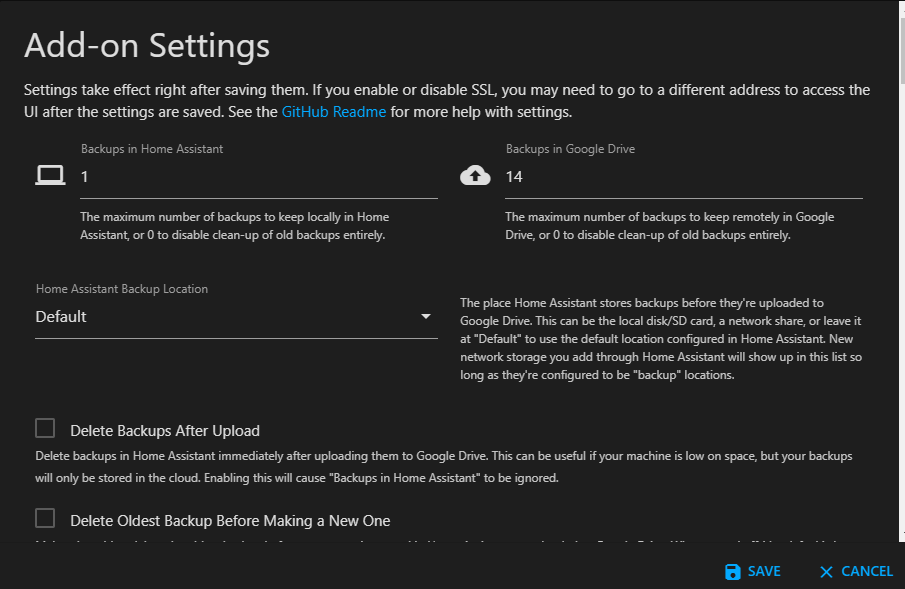
I personally create a daily backup, which is saved locally for one day under Home Assistant and uploaded to Google Drive. I keep 14 backups on Google Drive, so one backup per day for 14 days.

As you can see, my backups take up about 12GB, so you can go a long way with a free Google account.
3. backup of Home Assistant as a virtual machine (VM)
If you are running Home Assistant on a hypervisor such as Proxmox, VirtualBox or VMware as a virtual machine, it is also possible to back up the entire VM. This provides a complete copy of your entire system that you can restore if necessary.
Advantages:
- Complete backup: With VM backups, you can back up the entire Home Assistant system, including the operating system and all configurations.
- Fast recovery: In the event of an error, you can simply restore the virtual machine from the backup and save yourself the trouble of reinstalling and reconfiguring it.
- Snapshots: Many hypervisors offer snapshot functions that make it possible to quickly create a backup before making major changes.
Backup the VM in Proxmox:
- Create a snapshot: Go to your Home Assistant VM in the Proxmox interface, select “Backup” and create a manual snapshot backup. You can select whether only the VM or also the disks should be backed up.
- Set up automatic backups: Proxmox offers the option of setting up regular automatic backups. You can set schedules for daily, weekly or monthly backups.
- External backups: For additional security, you can configure Proxmox to copy the VM backups to an external storage such as a NAS or an external drive. This can be done via a network share or a USB storage device.
Conclusion
There are many ways to regularly back up Home Assistant, and each option has its own advantages. Using a NAS is ideal for local network storage, while the Google Drive Backup plugin offers a simple cloud-based solution. If Home Assistant is running as a virtual machine, VM backups are a particularly robust way to back up the entire system. By combining multiple backup strategies, you can ensure that your Home Assistant instance is protected against data loss and outages.
